How to install “Teslamate” – a great data logger and visualizer for your Tesla
Last week saw a very nice looking visualization of driving data from another Tesla owner which was done with the “Teslamate” data logger tool. The data visualization is done using Grafana, which I already know from another project I realized last year for my solar roof, called Solaranzeige.

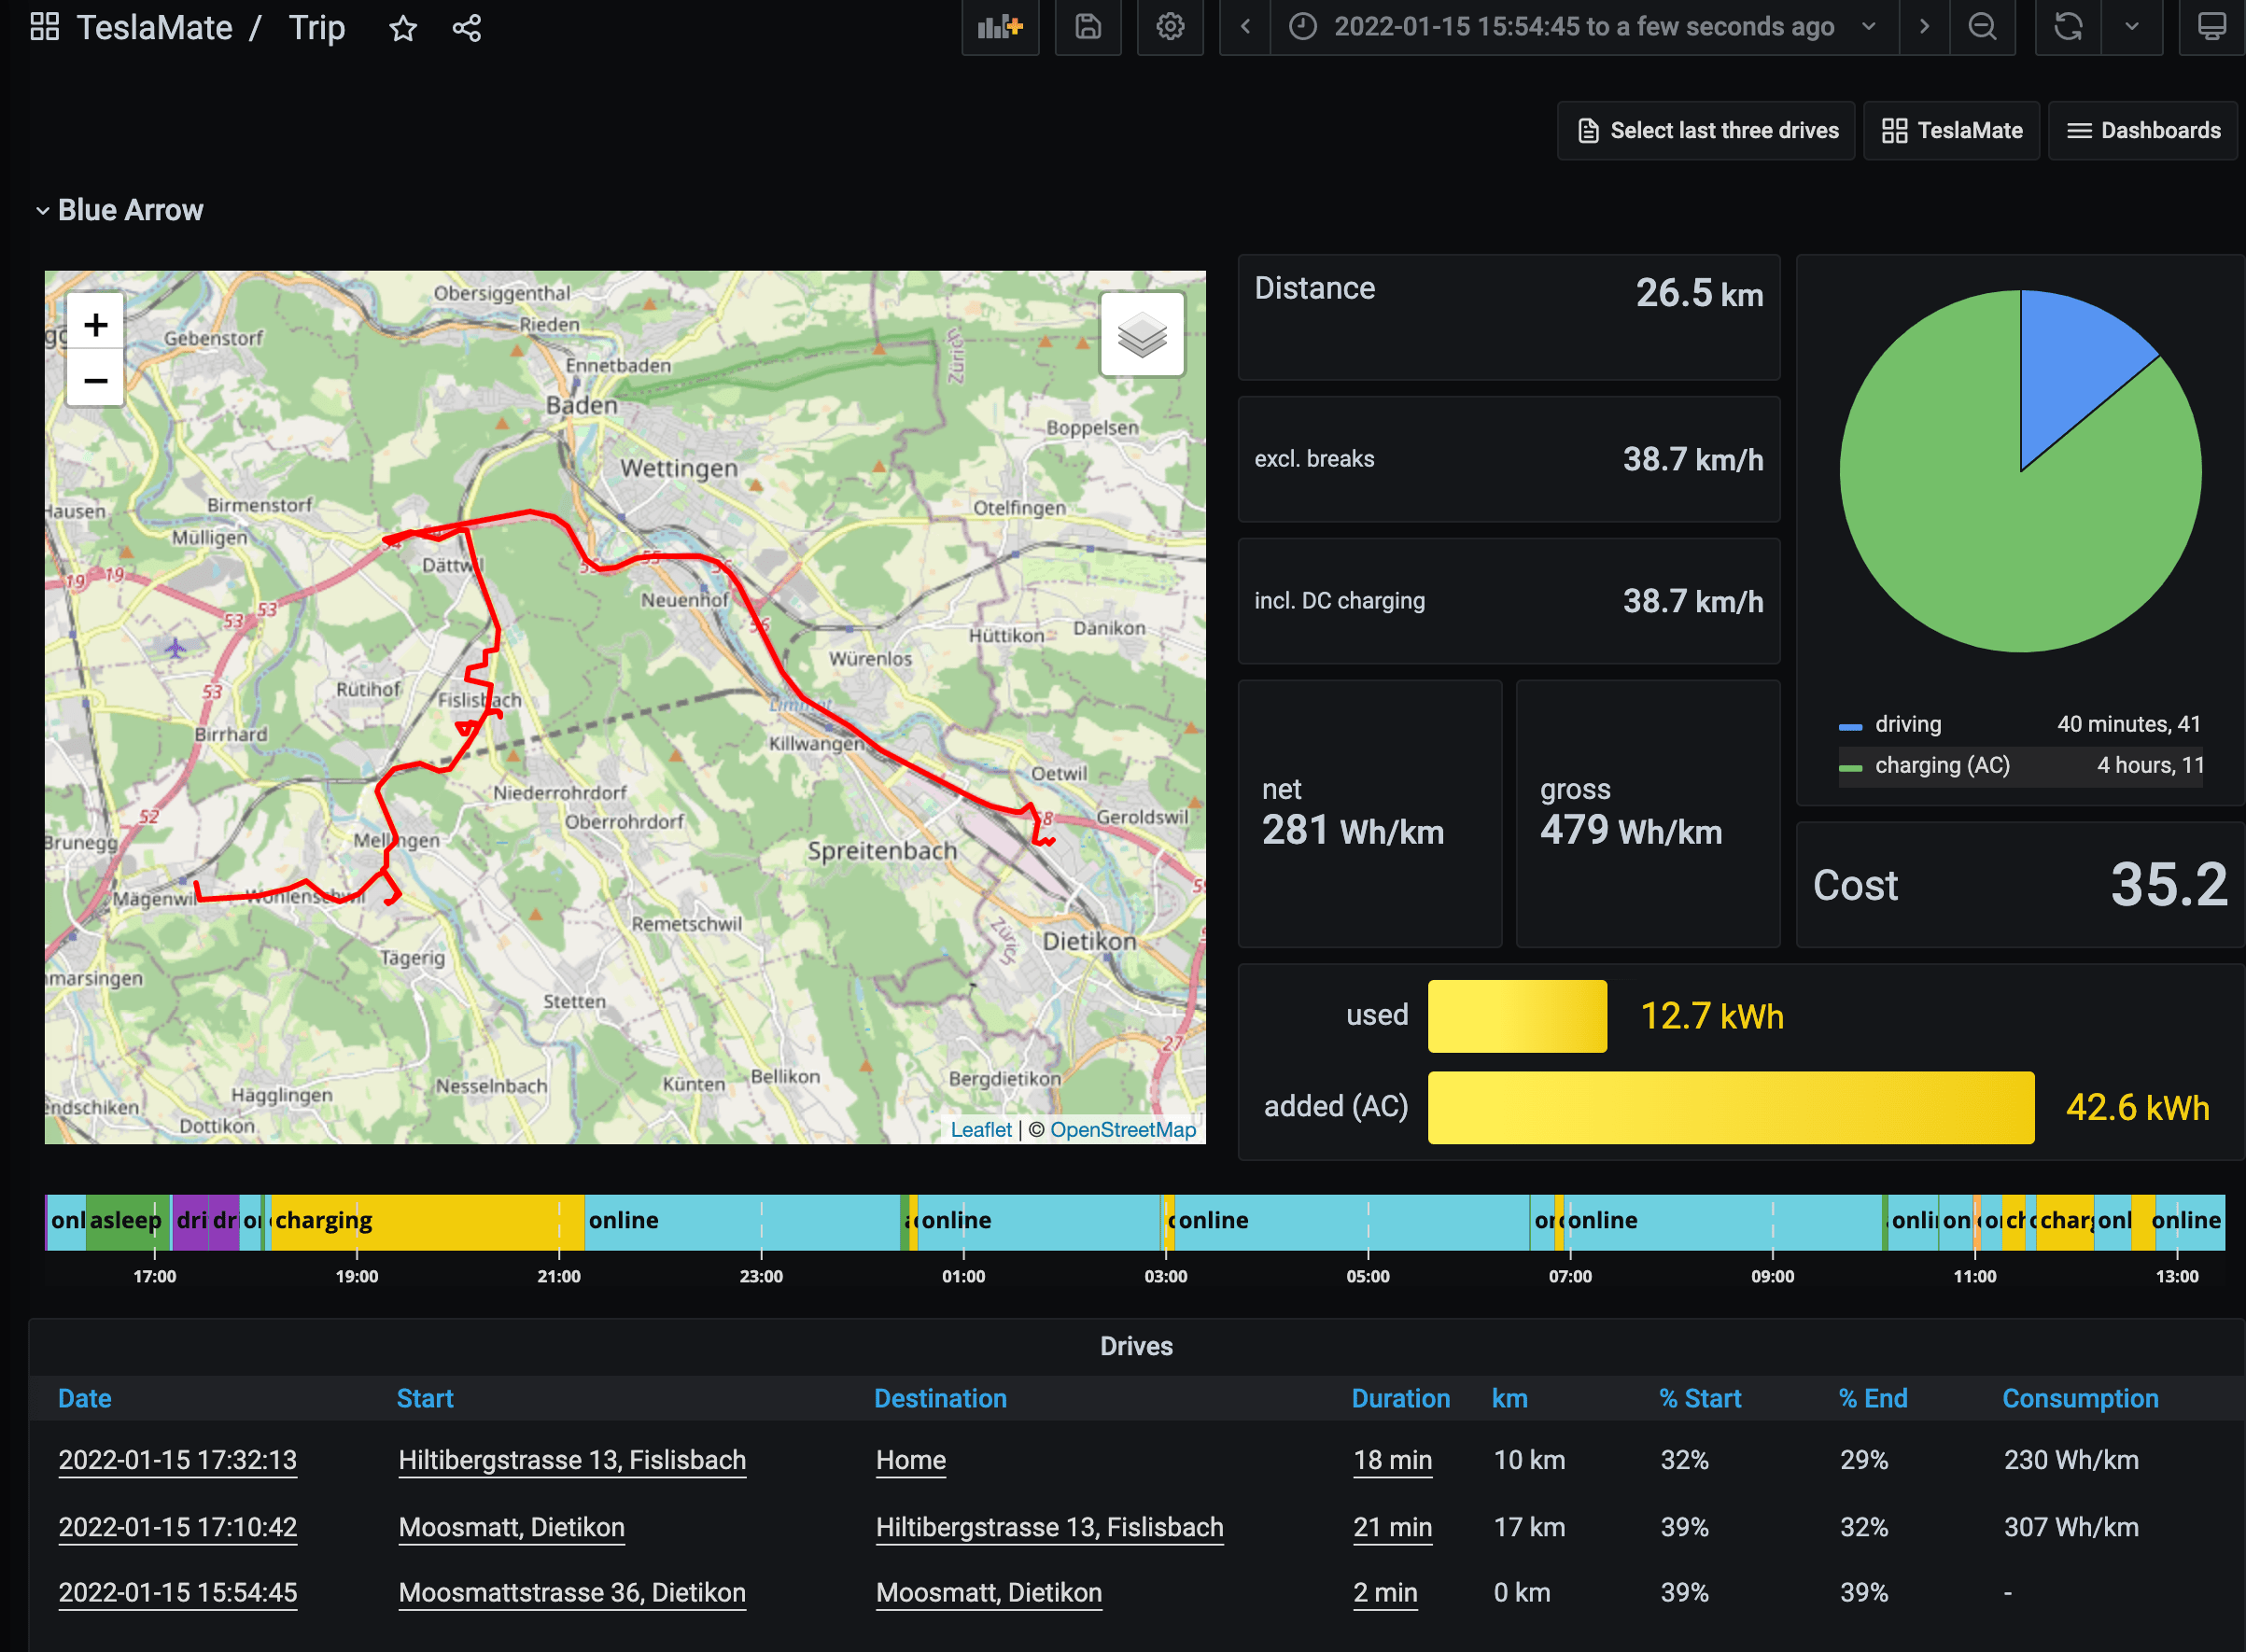
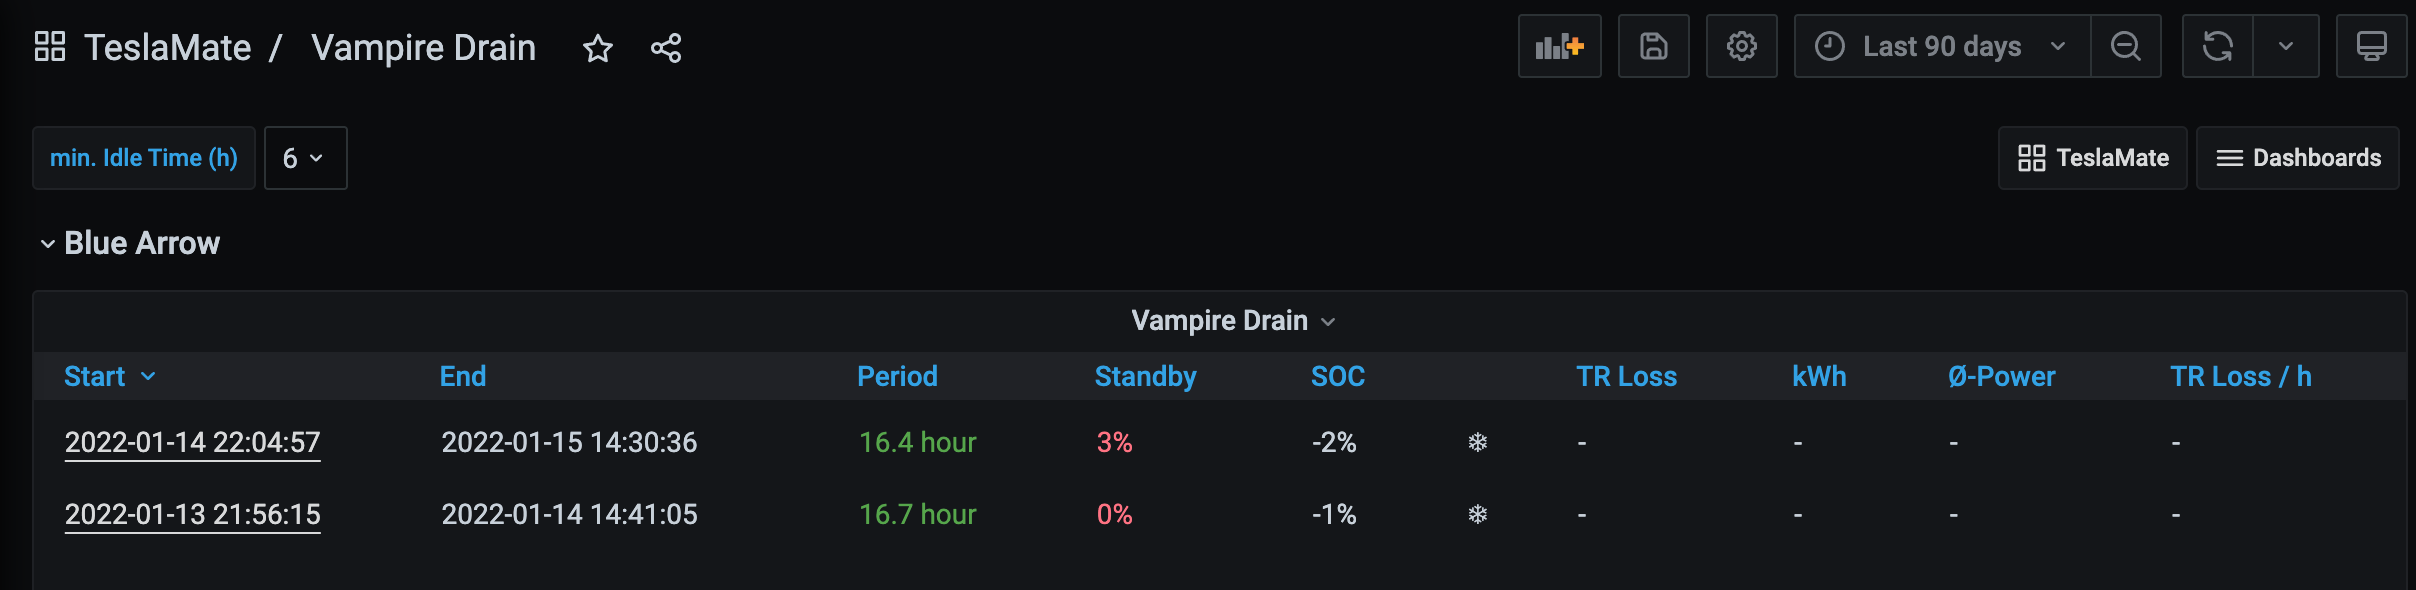
Teslamate provides a lot of interesting information in great looking dashboards such as:
- Charge level
- Efficiency
- Visited Locations
- Drives
So if you are a geek like me, you just have to install this thing as it provides a ton of great information about your car. And the good thing is that you are not sharing your Tesla username or password with anyone nor are you sharing any data with third parties either.


Since I am a huge fan of my Synology NAS where I run all kinds of apps, it was a no brainer to install Teslamate on my Synology, since it is always on anyway. Of course you can also install it on your PC or Mac, that is why I am showing you the installation process for both systems.
Teslamate installation on your Synology NAS
Yeah it looks like a lot of complicated steps, but it really is not very complicated. Just relax 🙂
- Install Docker on your Synology via the package center. Just search for “docker” and the docker application will show up.
- Download the file “docker-compose example.txt” and rename it to “docker-compose.yml”. Open the file in a text editor of your choice and make the following changes:
- Wherever it says “enter your password here” enter a password of your choice
- In line 13 replace the “192.168.86.xx” with the IP address of your Synology NAS
- In line 14 replace the CH with the country code you live in. You can look this up here on Wikipedia.
- Save the file to your computer. Make sure you save it in plain text format so that the specific formatting is not lost. I did not do this the first time around and got a bunch of error messages later on.
- You might have to manually force that the “yml” extension is used
- On your Synology open the File Station app and navigate to a folder that is easy to find. I used the “docker” folder that is already there in the root directory after the docker installation.
- Right click on your mouse and upload the “docker-compose.yml” file to this folder
- Make sure you have SSH access activated on your Synology. You can check by going to “Control panel -> Terminal & SNMP”. Make sure SSH is activated there.
- On your computer open an SSH client of your choice. I am working on a Mac so I tried the built in Terminal app but did not have any success. I then tried the great Termius app which is free and which worked just fine for me.
- In the termius app you can enter the needed information (IP Address, Admin Username and Password) and then just hit enter.
- If you do it manually in another SSH solution you just type: ssh admin@192.168.xx.xx and hit enter. (if your admin user is not called admin, then just use your admin user name.
- You are then asked to enter the admin password – this never worked for me, that is why I chose the termius app mentioned above.
- Enter your admin password.
- You will then see that the prompt has changed to admin@servername.
- Type sudo -i (this gives you root access). You will be asked for your admin password again. Enter the password.
- The prompt has now changed to root@servername
- Change to the docker directory by typing cd /volume1/@docker
- The prompt now shows root@servername:/volume1/@docker#
- Now you need to move the previously saved “docker-compose.yml” file to the @docker directory by entering the following command: mv /volume1/files/docker-compose.yml /volume1/@docker/docker-compose.yml. Make sure that “files” is replaced with the folder where you saved the yml file. In my case I used “docker” as I had copied the file to the docker folder.
- To check if this worked properly, type “dir” and then you will see the yml file in the @docker directory.
- Enter docker-compose up -d and hit enter
- Now a bunch of content is being downloaded and automatically installed on your Synology. After it is done, open the docker app on your Synology and go to the “container” section. It should look like this:

If you see the four containers running as in the image above, then everything worked just fine.
- Now open a web browser on your computer and enter 192.168.xx.xx:4000. This will open the Teslamate interface. Here you can chose to either login using your username and password or by using an authentication token. The username and password option does not work due to a captcha solution that Tesla just introduced, so you have to use a token. There are several apps that let you download your individual Tesla token. I used “Auth App for Tesla” in the Apple App store.
- Just copy both of the tokens to the relevant fields in the Teslamate interface and you should see the Teslamate start screen:

- In your browser enter 192.168.xx.xx:3000 and the Grafana login page will open. Here I tried to enter the password I had previously defined in the docker-compose.yml file, but these did not work. I googled a bit and found that you need to enter “admin” as the user and “admin” as password. You are then asked to set a new password.
- Once that is done, the Grafana Dashboard will open.
- On the left side you can click on “Manage Dashboards” and look for the “Teslamate” folder – in there you can find many great dashboards for your tesla
Teslamate installation on your Computer
- Download the Docker Application to your computer
- Create a new folder anywhere on your computer. Call it “Teslamate” or whatever you like. I added a folder “Teslamate” on my desktop
- Open the Docker App that you just installed
- Click on the “Start” button
- On the right hand side in the black window enter cd desktop and then cd teslamate
- Open your browser and go to this address: https://github.com/adriankumpf/teslamate
- There is a green button on the page called “code”. Click it and copy the Github URL by clicking on the little “copy” icon that is displayed to the right of the URL.
- In the docker window type git clone and paste the URL that you just copied right after “git clone”. Don’t forget to add a space after the word “clone”. Hit Enter.
- Now docker downloads and installs all the necessary files into the folder you created earlier. In my case into the “teslamate” folder on my desktop
- Download the file “docker-compose example.txt” and rename it to “docker-compose.yml”. Open the file in a text editor of your choice and make the following changes:
- Wherever it says “enter your password here” enter a password of your choice
- Delete line 13 as you don’t need this when you are installing on your local machine
- In line 14 replace the CH with the country code you live in. You can look this up here on Wikipedia.
- Save the “docker-compose.yml” into the “teslamate” folder on your desktop
- Back in your docker application, enter the following code: docker-compose up -d and hit enter.
- After the installation is done, you should see four new containers running in your docker environment.
- Now open a web browser on your computer and enter 192.168.xx.xx:4000. This will open the Teslamate interface. Here you can chose to either login using your username and password or by using an authentication token. There are several apps that let you download your individual Tesla token. I used “Auth App for Tesla” in the Apple App store.
- Just copy both of the tokens to the relevant fields in the Teslamate interface and you should see the Teslamate start screen:
- In your browser enter 192.168.xx.xx:3000 and the Grafana login page will open. Here I tried to enter the password I had previously defined in the docker-compose.yml file, but these did not work. I googled a but and found that you need to enter “admin” as the user and “admin” as password. You are then asked to set a new password.
- Once that is done, the Grafana Dashboard will open.
- On the left side you can click on “Manage Dashboards” and look for the “Teslamate” folder – in there you can find many great dashboards for your tesla
And that’s it. It takes a while for Teslamate to display meaningful data. So let it running for a couple of days and then your dashboards will be filled with interesting information about your Tesla !


Hello,
Thank you very much for these very helpful instructions !
One question:
In the “docker-compose example.txt” file, in the voices “DATABASE_PASS=enter your password here” and “POSTGRES_PASSWORD=enter your password here” , which password you have to insert ?
Just to be clear.
Thanks !
Best regards
hi Aris – you can set any password you like. So you define this password by yourself.
Cheers
Marc
i did all that on my synology and i get
ERROR: for teslamate Cannot start service teslamate: Bind mount failed: ‘/volume1/@docker/import’ does not exists on the last container called docker_teslamate1
Hello,
Thanks for these very helpful instructions.
Just one question: what password you have to insert in the “DATABASE_PASS=enter your password here” and “POSTGRES_PASSWORD=enter your password here” fields on the “docker-compose example.txt” file ?
Thanks in advance.
Best regards
Aris
Hi – you can set any password you like. I used the same password for all the “enter your password here” instances.
Cheers
Marc
Thank you so much.
It´s my first time installing with docker-compose.
I had to do this modifications to get it to work..
1. Add a import folder in /volume1/@docker/
2. Added ENCRYPTION_KEY= to the docker-compose file.
3. Allow port 3000,4000,5432 in the dsm firewall.
4. I had problems with the token verification in teslmate. Found out that teslamate docker has an internal ip of 172.18.0.x without internett connection. I then had to allow traffic from that range to all ports and all ip´s in Synology firewall.
Hi
I have to send you a big thank you – you really made me do a sucessfull Teslamate installation on my Synology Nas. I thougt it shuld be extreamly diffecult so I have postpone it for month. So I have used TeslaFi until now – just have to convert my data to Teslamate.
I have one question for you. What solution do you use for the ENCRYPTION_KEY? Do you store in the docker-compose.yml ?
Thanks again
I really apricate your simple tutorial.
it would be great if you have created some nice dashboards that you could share.’
have a great day
Best regards
Lars
Hi Lars – thanks for your praise. Very glad I could help someone. Actually I am not even aware of using / setting an encryption_key anywhere in my docker-compose.yml. So I am sorry I can’t help you there. What would that encryption key be for ?
Have a great day Lars !
Thank you for step-by-step instructions. I am attempting to install on Synology. Could you please help me resolve the error below that I received on step 23?
ERROR: for teslamate Cannot start service teslamate: Bind mount failed: ‘/volume1/@docker/import’ does not exists
Full log is posted below:
root@HomeDrive:/volume1/@docker# docker-compose up -d
Creating network “docker_default” with the default driver
Creating volume “docker_teslamate-db” with default driver
Creating volume “docker_teslamate-grafana-data” with default driver
Creating volume “docker_mosquitto-conf” with default driver
Creating volume “docker_mosquitto-data” with default driver
Pulling database (postgres:13)…
13: Pulling from library/postgres
3f9582a2cbe7: Pull complete
0d9d08fc1a1a: Pull complete
ecae4ccb4d1b: Pull complete
e75693e0d7a5: Pull complete
1b6d5aead1a8: Pull complete
f2aa67d9a6b2: Pull complete
7a3ec0371e36: Pull complete
704d9d1b662d: Pull complete
7d98b6a1cf88: Pull complete
e085f9ffedd1: Pull complete
077768f92fb7: Pull complete
1c4edfefba9b: Pull complete
d9c2e34993e8: Pull complete
Digest: sha256:a06b381f1ed083cf85900b4814936b6c85a93e820c9924a0a9d622054ce353b9
Status: Downloaded newer image for postgres:13
Pulling grafana (teslamate/grafana:latest)…
latest: Pulling from teslamate/grafana
9621f1afde84: Pull complete
58183eebe674: Pull complete
ac66559c5663: Pull complete
06b1126083c4: Pull complete
c4ffcf8ec171: Pull complete
ab007e9097aa: Pull complete
0abbf68e5b2b: Pull complete
95904035e1c0: Pull complete
054e462c0a16: Pull complete
8eb36bd10148: Pull complete
9d0e1be0add5: Pull complete
e0f72618bdfe: Pull complete
591094c777c0: Pull complete
03305f809d08: Pull complete
224574ac8edc: Pull complete
8c414a9f3065: Pull complete
bbfd0aed5389: Pull complete
cf09ea26d08e: Pull complete
9bae9fdee26b: Pull complete
Digest: sha256:adbd516a291696dd87a5e3ef89bdd3cad8b9ef04a60d891d812f40568a13f6c4
Status: Downloaded newer image for teslamate/grafana:latest
Pulling mosquitto (eclipse-mosquitto:2)…
2: Pulling from library/eclipse-mosquitto
ef5531b6e74e: Pull complete
a7ca8a06e1f9: Pull complete
b02910b6532b: Pull complete
Digest: sha256:73470c475b9688390cbff7802b1c1edde574a1edded1bd9b462d5942c69764da
Status: Downloaded newer image for eclipse-mosquitto:2
Creating docker_mosquitto_1 … done
Creating docker_database_1 … done
Creating docker_grafana_1 … done
Creating docker_teslamate_1 … error
ERROR: for docker_teslamate_1 Cannot start service teslamate: Bind mount failed: ‘/volume1/@docker/import’ does not exists
ERROR: for teslamate Cannot start service teslamate: Bind mount failed: ‘/volume1/@docker/import’ does not exists
ERROR: Encountered errors while bringing up the project.
root@HomeDrive:/volume1/@docker#
Create the folder that it says is missing
Your steps were spot on. Mine for some reason did not have the import folder per error below. Once creating it, I was good to go!
ERROR: for teslamate Cannot start service teslamate: Bind mount failed: ‘/volume1/@docker/import’ does not exists
Merci pour cette documentation 😉
Par conter je rencontre un problème avec la commande de la ligne 23.
Voici le message d’erreur:
root@SERVER:/volume1/@docker# docker-compose up -d
ERROR: The Compose file ‘./docker-compose.yml’ is invalid because:
‘prestations de service’, ‘tomes’ do not match any of the regexes: ‘^x-‘
You might be seeing this error because you’re using the wrong Compose file version. Either specify a supported version (e.g “2.2” or “3.3”) and place your service definitions under the `services` key, or omit the `version` key and place your service definitions at the root of the file to use version 1.
For more on the Compose file format versions, see https://docs.docker.com/compose/compose-file/
Bonjour et un grand merci pour ces explications.
Par contre, je rencontre un problème avec la commande docker-compose up -d à la ligne 23.
Voici le message d’erreur:
root@DS0-LC:/volume1/@docker# docker-compose up -d
ERROR: The Compose file ‘./docker-compose.yml’ is invalid because:
‘prestations de service’, ‘tomes’ do not match any of the regexes: ‘^x-‘
You might be seeing this error because you’re using the wrong Compose file version. Either specify a supported version (e.g “2.2” or “3.3”) and place your service definitions under the `services` key, or omit the `version` key and place your service definitions at the root of the file to use version 1.
For more on the Compose file format versions, see https://docs.docker.com/compose/compose-file/
[…] How to install “Teslamate” – a great data logger and visualizer for your Tesla […]
thank you for step by step and I do not have any knowledge about IT and docker. I tried to follow the steps, as I am getting my MY LR and wants to use Teslamate for my Synology (NAS) but I failed (honestly lost) from step 11 onwards 🙁
Can you help me what do i do next, where & how? Really basic / 101 thing, but I don’t know
Hi Neel – using an SSH client is indeed intimidating if you have never done this before. Were you able to connect to your Synology NAS via SSH ? If yes, where you able to navigate to the @docker folder ?
Yes so far able to get through all the steps until 10….
FYI, as I am not a computer scientist, I have been using https://www.myteslamate.com for 1 year and it does the job perfectly 🙂
And thank you for your article!
Jerome – yes I know about myteslamate.com – It sure is a great solution for someone who does not want to mess with all of the manual installation.
What Start button are you referring to.
Click on the “Start” button
On the right hand side in the black window enter cd desktop and then cd teslamate.
My Docker Desktop shows Containers, Images, Volumes, Dev Environment etc on left hand side.
When you install Docker locally and run the app, then you can see a “start” button in the interface. Press that one.
I must be doing something wrong as I don’t see start or any black window where I can run commands. Unless you mean to go Command Prompt in Windows and run it there.
I figure it out for Windows you need to go to Terminal (Windows -> Start -> Terminal in All Apps and then run command “docker-compose up -d” in there.
I have not seen any other terminal window in Docker.
Once its all installed going to the 192.168.xx.xx:4000 opens up teslamate page which you login using API only now no more option of using your username or password.
However Dashboards are still not showing any data in Grafana.
I get following error; (No Dashboard is showing)
An error occurred within the plugin
Object
status:500
statusText:”Internal Server Error”
data:Object
message:”An error occurred within the plugin”
messageId:”plugin.downstreamError”
statusCode:500
traceID:””
config:Object
url:”api/ds/query?ds_type=postgres&requestId=Q100″
method:”POST”
data:Object
requestId:”Q100″
hideFromInspector:false
headers:Object
retry:0
traceId:undefined
message:”An error occurred within the plugin”
I’m afraid I can’t help you with that particular problem. You can go to the teslamate page on github and place your issue there. (Just Google for teslamate and github). Have a great Xmas!
Postgres value needs to be 17, not 13